

This is the first in a series of occasional posts talking about short projects I have undertaken; ranging from the things that went well, via not so well to projects I’d rather forget.
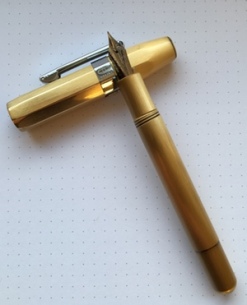
The first of these projects to be completed is the renovation of my brass Delike Alpha; now I am aware that this has all been done before but I’m not sure anyone (with no experience whatsoever) has literally done it by hand i.e. no work bench, no tools just some fine grit paper (1250 & 2500) a tube of Autosol polish, masking tape and a couple of cloths.
Our story begins not with ‘once upon a time’ but with ‘ooh that looks nice’ as I idly trawled eBay, several clicks later the order was placed and my pen was ordered.
It was at this point I decided to look into the pen and read some reviews (smart me would have done this before ordering) and everything was positive and then I came across posts talking about whether or not to modifying the pen.
This was centred around either stripping the lacquer and polishing the pen or leaving it as is. I should say at this point that I think either way it’s a nice pen; lacquered helps to protect the brass and stripped allows it to develop its own patina rather like the brass Kaweco, and this got me thinking.
For me the only problem was the nib, the pen shipped with an EF nib so I decided that I would replace the nib and ordered a pack of five medium nibs from another eBay supplier and waited.
Little did I know that my nibs would take a two-week vacation in the Customs office and my pen would be taken hostage by the Hermes courier company.
In the past I’ve dealt with FedEx, DPD and UPS and if they can’t deliver they are always willing to talk to you and arrange to redeliver or allow you to collect from their offices etc (oh and they have people you can talk to). Not Hermes, not only is it web chat only (you are not allowed to speak to a real person) but I’m not convinced it’s anything more that automated responses from the script.
After an extremely frustrating half hour I closed the call and contacted the seller explaining that the pen was now a hostage and my hostage negotiations had failed, the seller was kind enough to contact his shipping agent who arranged the release of my pen.
So finally, I had both my nibs and my pen; a word here about the packaging, it ships in a very nice foam lined tin with an embossed lid and protective sleeve, I have to say, for what I paid, this was very impressive.
Now that I had got the pen it was easier to decide whether or not to make changes to it.
Firstly, I washed it out and flushed the nib, it is worth doing this as I found a lot of brass flakes from the production process in the barrel and once the pen had dried out I dip tested the nib, in my opinion it leans more towards being a F nib that an EF.
Having finished testing and inspecting the pen I decided to go ahead and renovate the pen by stripping the lacquer and swapping the nib for an M nib.
Right about now you might want to make some coffee; what comes next is going to take a while because it’s my photo journal; all 17 pictures (some of which are a little fuzzy as they were taken in poor lighting conditions) of it with notes plus the recipe.
Recipe
- 1 Delike Alpha Brass Pen – eBay
- 1 sheet 1250 grit paper – Amazon
- 1 sheet 2500 grit paper – Amazon
- 1 tube Autosol polish – Amazon or a car parts store
- 1 Blue Masking Tape – Available at every DIY store
- 1 replacement nib – eBay (pack of 5)
- 1 donor pen (I thought I needed but didn’t)
- Assorted cleaning/polishing cloths
- Lots of disposable gloves
- Patience
 Step 1
Buy a Delike Alpha Brass Pen and convince yourself that if you don’t like it everything you’ve read so far makes renovation sound really easy and you can do it!
 Step 2
After deciding I want to strip the lacquer off the pen I started with a test patch on one of the flat surfaces of the cap using the 1250 grit paper and a very small dab of Autosol. Once stripped of lacquer I went over it again with 2500 grit paper and more dabs of Autosol and finally a cloth and Autosol. Being pleased with the result I proceeded to polish the remaining panels of the cap.
One thing I did notice was that the open edge of the cap was quite sharp to the touch so I smoothed this off before working on the panels of the cap.
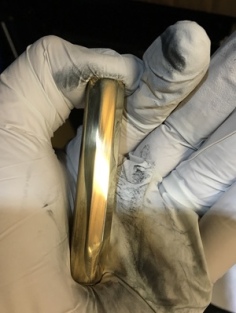
 Step 3
The Finial. This was actually quite awkward to polish as it is very small and I found that the best way to polish was a small area at a time, working from the edge to the point, then turn and repeat until complete.
I used the masking tape to protect the upper edge of the cap, one slip and I was going to damage a polished panel; this had the added bonus of making the cap easier to hold which speeded up the process, so every cloud.
 Step 4
This shot shows the final polish being put on the cap with just a cloth and Autosol.
 Step 5
The finished cap.
 Step 6
The barrel and section disassembled.
 Step 7
The threads on both the barrel and the section are seen taped. I noticed the threads were quite shallow and when stripping and polishing the cap the brass had felt quite soft compared to my Kaweco, so I decided to tape over them to protect them.
 Step 8
This is the barrel and section midway through the lacquer removal and polishing, the lacquer on the barrel and section seemed thinner than the cap; I assumed the layer on the cap may have been thicker as a result of the process used to print ‘War and Peace’ on it.
 Step 9
Here I have finally finished stripping and polishing the barrel, it proved a little fiddly around the area where it steps down but having the tape on it made it easier to hold and angle to strip the lacquer.
 Step 10
You see I wasn’t joking when I said it was all done by hand!
 Step 11
This shot shows the finished brass parts of the pen. I was very pleased with the final finish on them, I had been concerned that not having even the most basic work table and tools that it might prove very difficult to strip and polish the parts; it turned out that what I thought would be most fiddly, the section, was, in fact, the easiest, go figure.
 Step 12
The donor pen that never was. I originally thought I might be able to swap out the nib and feed for one from a Jinhao 992, the answer was a resounding no. they might look the same but my Delike won’t take it. The upside is that I now have several 992’s I can play with.
 Step 13
Close up of the existing EF nib and feed (left) and the new M nib (right). The existing nib and feed proved very difficult to remove, so if you are contemplating this prepare for a struggle. I thought extraction was difficult until I started to try to put the new nib in; the feed (I re-used the original feed) slotted back in on its own but not go in with the new nib and after several attempts I had to concede that I would be doing this the hard way.
I refitted the feed and then started the tricky business of adding the nib; I found it easier to do after dropping the feed et cetera into very hot water for a few minutes. Ironically, I then pushed the nib in a bit too far so it was back to the hot water for a few more minutes and I was then able to adjust the position of the nib until I was satisfied with it.
 Step 14
A close up of the finished nib.
 Step 15
The finished pen.
 Step 16
This is just a shot of the pen next to the small Mala pen sleeve it now lives in; to give you an idea of scale, this sleeve that also fits my Kaweco pens.
 Step 17
Just one final shot to show it fits in the sleeve.
Final Thoughts
Thank you for sticking with me through this long post; I do hope it has been useful. I went full tilt at a project with no experience whatsoever and I’m happy to say it worked out, the pen writes surprising well considering the nib is a basic stiff stainless-steel nib.
Would I do it again, definitely not. It was a lot of fun, but it was done on a wing and a prayer, however, if you really want to do this I would recommend using Dremel or similar tool as this will make light work of it and you will have a lovely brass pen at the end of it for the fraction of the cost the Kaweco.
Disclaimer: Everything used in this project was purchased with my own funds at retail price. The opinions expressed in this review are my own; and I am not connected with any of the retailers or manufacturers in any way.

[…] Renovating A Brass Delike Alpha (via The Indian Marmalade Company) […]
LikeLike
What brand and size nib did you use?
LikeLike
Hi Jason
I just bought a pack of 4 Chinese nibs listed as medium (they weren’t much different from the original fine nib) but the nib was a difficult to fit.
This seller has a 2 pack for the Delike Alpha, and I would recommend checking these out before going down the generic route: https://www.ebay.com/itm/2pc-fountain-pen-Nibs-Medium-and-EF-bent-nib-for-DELIKE-alpha-and-NEW-MOON/232706091870?hash=item362e5d2b5e:g:qLoAAOSwNbFasxAe
He’s a very good seller, I’ve bought from him many times, and he’s always been very helpful. If there is anything else I can do to help feel free to email me – details on the About & Contact page.
Charlie
LikeLike